Docker部署 Ghost 博客
Ghost 官方并没有提供 docker 镜像,是社区制作的。
本次实验环境为:
-
VPS: 2 核 CPU,4G 内存,8M 宽带
-
Linux: Ubuntu Server 20.04
-
Docker: v20.x
-
Ghost: 5.x
Docker Compose 配置
Ghost 支持两种数据库,本地开发默认 SQLite,Release 默认是 MariaDB。MariaDB 是 MySQL 的一个分支,完全兼容 MySQL。
本次部署采用 MariaDB,先创建一个空目录/home/ghost-blog,然后在ghost-blog创建一个docker-compose.yml文件。
docker-compose.yml具体配置如下:
# docker-compose.yml

version: '3.3'

services:
  ghost:
    # 这里采用最新的,为了方便
    image: ghost:latest
    # 主机重启时容器自动重启
    restart: always
    # 映射到本机的3050
    ports:
      - 3050:2368

    depends_on:
      - db

    # 映射一下容器到主机的目录
    volumes:
      - /home/ghost/content:/var/lib/ghost/content

    # Ghost blog 参数
    environment:
      # 域名
      url: https://blog.zhangwen.site
      # 数据库参数
      database__client: mysql
      database__connection__host: db
      database__connection__user: ghost
      database__connection__password: ghostdbpass
      database__connection__database: ghostdb

  db:
    image: mariadb:latest
    restart: always
    environment:
      # 改成自己的密码
      MYSQL_ROOT_PASSWORD: xxxxxxx
      MYSQL_USER: ghost
      MYSQL_PASSWORD: ghostdbpass
      MYSQL_DATABASE: ghostdb
    volumes:
      - /home/ghost/mysql:/var/lib/mysql
启动容器: docker-compose up -d
Nginx 配置
当然,首先确保已安装 Nginx,没有的话,一条命令就可以了:
sudo apt install nginx
然后创建配置 config 文件,这里一般我会取域名的名字blog.zhangwen.site,因为我自己有几个二级域名,这样可以更容易区分配置文件。
sudo vim /etc/nginx/sites-available/blog.zhangwen.site
复制如下内容到配置文件,注意修改server_name:
# Sample Nginx HTTP Configuration
server {
        # Your server URL here
        server_name blog.zhangwen.site;
        listen [::]:80;
        listen 80 ;
    # disable any limits to avoid HTTP 413 for large image uploads
    client_max_body_size 0;

    # required to avoid HTTP 411: see Issue #1486 (https://github.com/docker/docker/issues/1486)
    chunked_transfer_encoding on;

    location / {
            proxy_set_header X-Real-IP $remote_addr;
            proxy_set_header X-Forwarded-For $proxy_add_x_forwarded_for;
            proxy_set_header X-NginX-Proxy true;
            proxy_pass http://0.0.0.0:3050/;
            proxy_ssl_session_reuse off;
            proxy_set_header Host $http_host;
            proxy_cache_bypass $http_upgrade;
            proxy_set_header X-Forwarded-Proto $scheme;
            proxy_read_timeout 900;
            proxy_redirect off;
    }
}
创建配置文件的软链接到/etc/nginx/sites-enabled/,nginx -t测试配置文件的有效性,最后重新启动 Nginx:
sudo ln -s /etc/nginx/sites-available/blog.zhangwen.site /etc/nginx/sites-enabled/
sudo nginx -t
sudo systemctl restart nginx
添加 SSL
我们借助Certbot这个工具,它使用LetsEncrypt获取一个免费的证书,自动配置 ssl,过期了也会自动续期。
安装 Certbot
sudo add-apt-repository ppa:certbot/certbot
sudo apt-get update
sudo apt-get install python-certbot-nginx
配置 Nginx
sudo certbot --nginx -d blog.zhangwen.site
这个命令会提几个问题,其中有一个是问你是否重定向所有的 HTTP 请求到 HTTPS,我建议选择"2",即自动重定向。
完成之后,certbot 会修改你的/etc/nginx/sites-available/blog.zhangwen.site文件,里面的端口改成了 443 等
自动更新镜像
- 创建一个更新脚本
update.sh:
#! /bin/sh
echo Pulling New Build
docker pull ghost:latest
echo Stopping Old Build
docker-compose down
echo Starting New Build
docker-compose up -d
- 设置可执行文件:
chmod +x update.sh - 设置定时任务:
crontab -e# m h dom mon dow command 0 0 * * 0 cd /home/ghost-blog && ./update.sh
配置 Ghost
文章添加目录
主要用到了tocbot这个库。
开始在官方文档里面找方法,然后看到了How to add a table of contents。但这个样式不是自己想要的,后来看到了How to setup the table of contents in ghost.org。
这个功能不太适合在管理面板里的Code Injection里面修改,改的地方太多了,所以需要 clone 一份主题,然后自己修改。
自定义社交平台图标
Ghost 默认是 Facebook 和 Twitter,我想把 Facebook 去掉,然后添加 GitHub、微博等图标。
找到一篇官方文档:How to add social media icons to your theme,但这篇文章跟 Ghost 的主题设置的有很大差别,参考价值不大,最后还是靠自己摸索得出如下方法:
- Ghost 默认使用 Simple Icons,全是 SVG 的图标,刚好能找到 GitHub 和微博。点击图标可以复制 SVG 代码,假如我们选择 Github,在
partials/icons/目录里创建一个github.hbs文件,把 SVG 代码复制到文件里:
<svg role="img" viewBox="0 0 24 24" xmlns="http://www.w3.org/2000/svg">
  <title>Twitter</title>
  <path
    d="M23.953 4.57a10 10 0 01-2.825.775 4.958 4.958 0 002.163-2.723c-.951.555-2.005.959-3.127 1.184a4.92 4.92 0 00-8.384 4.482C7.69 8.095 4.067 6.13 1.64 3.162a4.822 4.822 0 00-.666 2.475c0 1.71.87 3.213 2.188 4.096a4.904 4.904 0 01-2.228-.616v.06a4.923 4.923 0 003.946 4.827 4.996 4.996 0 01-2.212.085 4.936 4.936 0 004.604 3.417 9.867 9.867 0 01-6.102 2.105c-.39 0-.779-.023-1.17-.067a13.995 13.995 0 007.557 2.209c9.053 0 13.998-7.496 13.998-13.985 0-.21 0-.42-.015-.63A9.935 9.935 0 0024 4.59z"
  />
</svg>
注意,SVG 的rol="img"属性要改成class="icon"
-
在
package.json里面的config.custom增加一个自定义参数github_account,这样可以在后台管理面板中修改参数:"body_font": { "type": "select", "options": [ "Modern sans-serif", "Elegant serif" ], "default": "Modern sans-serif" }, "github_account": { "type": "text" }, -
在
author.hbs文件里,找到 Twitter 部分,加上如下代码:{{#if @custom.github_account}} <a class="share-link share-link-github author-social-item" href="https://github.com/{{@custom.github_account}}" target="_blank" rel="noopener noreferrer" > {{> "icons/github"}} GitHub </a> {{/if}} -
同样的操作,在
default.hbs文件里,找到 Twitter 部分,加上如下代码:
{{#if @custom.github_account}}
<a
  class="social-item social-media-item"
  href="https://github.com/{{@custom.github_account}}"
  target="_blank"
  rel="noopener noreferrer"
  aria-label="Github"
>
  {{> "icons/github"}}
</a>
{{/if}}
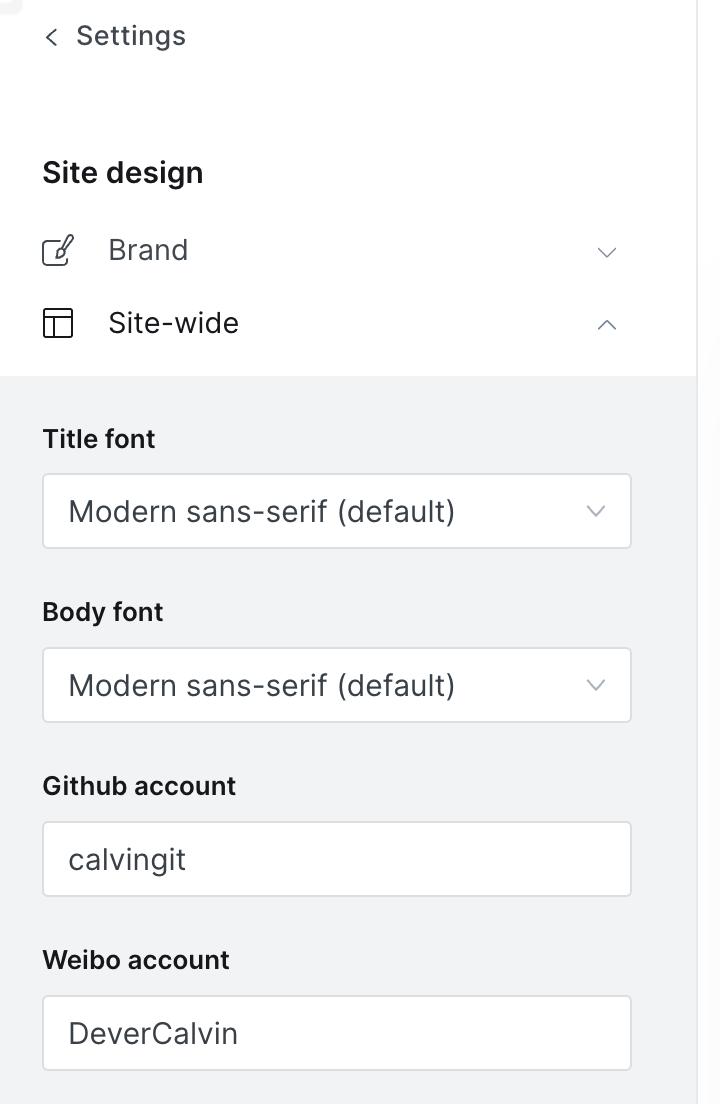
- 打包主题
yarn zip,上传到后台,刷新后台页面,在Settings/Site design/Site-wide可以看到 GitHub acount 的设置
自定义代码高亮主题
官方文档: https://ghost.org/tutorials/code-snippets-in-ghost